What is MQTT?
MQTT (Message Queuing Telemetry Transport) is a standard messaging protocol created by OASIS for the IoT. This protocol based on message publishing and subscription is extremely lightweight. So much so, that it is currently used for connecting remote devices that have a small code memory and minimal network bandwidth. MQTT is used today, in addition to makers and IoT devices, in a wide variety of industries, such as automotive, manufacturing, telecommunications, oil, gas, etc.
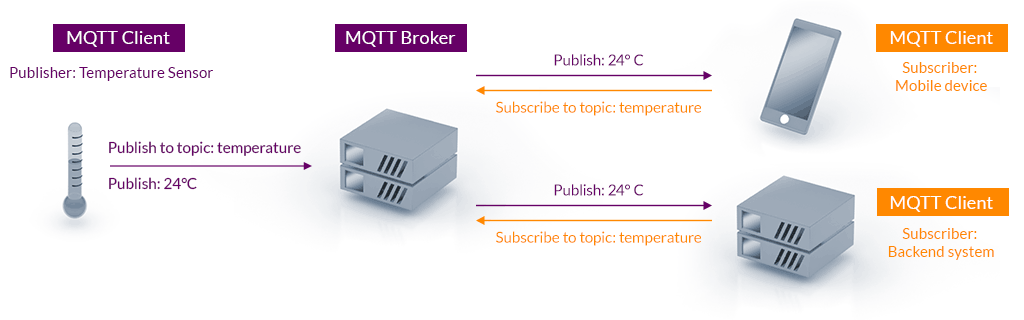
The sending of messages is based on the use of a Broker to which the different devices connect to publish messages in topics, read these messages, or perform both actions. An outline of the operation would be as shown in the following image (MQTT, 2023)
Features
Lightweight and efficient
MQTT clients require minimal resources, so they can be used on small microcontrollers. MQTT message headers are small to optimize network bandwidth.
Two-way communications
MQTT enables device-to-cloud and cloud-to-device messaging. This facilitates the transmission of messages to groups of things.
Scales to millions of things
MQTT is scalable to connect to millions of IoT devices.
Reliable message delivery
Reliability of message delivery is important for many IoT use cases. This is why MQTT has 3 defined Quality of Service (QoS) levels: 0: at most once; 1: at least once; 2: exactly once.
Support for unreliable networks
Many IoT devices connect over unreliable cellular networks. MQTT’s support for persistent sessions reduces the time to reconnect the client to the Broker.
Security enabled
MQTT facilitates message encryption using TLS and client authentication using modern authentication protocols such as OAuth.
How to connect to an MQTT Broker
There are several public MQTT Brokers with which you can practice reading and sending messages: HiveMQ (HiveMQ, 2023), Eclipse (Eclipse, 2023), mosquitto (Mosquitto, 2023), etc.
There are also several methods to connect to any MQTT Broker, depending on the operating system you use and the programming language you use. Some examples are as follows (Cope, Beginners Guide To The MQTT Protocol, 2018).
- Paho Python client (Python Package Index, 2021)
- Node.js MQTT Client (npm – , 2022)
- JavaScript Websockets (Cope, Using The JavaScript MQTT Client With Websockets, 2022)
- C++ Client with Arduino (Söderby, s.f.)
In this post, we will use an MQTT client called MQTT-Explorer (Nordquist, 2019) available for Windows, Mac and Linux.
After downloading it (and optionally installing the portable version) we will run it and a window similar to the following one will appear:
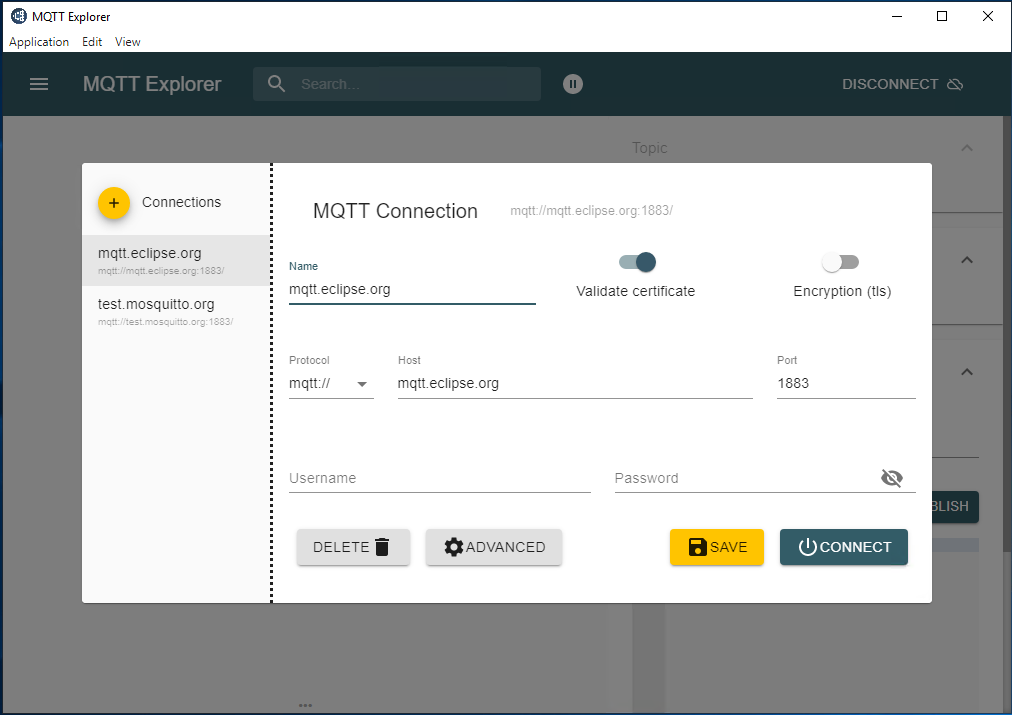
Here we can either connect to an existing public Broker or to a private one that we have created. We will see how to do this in the next section.
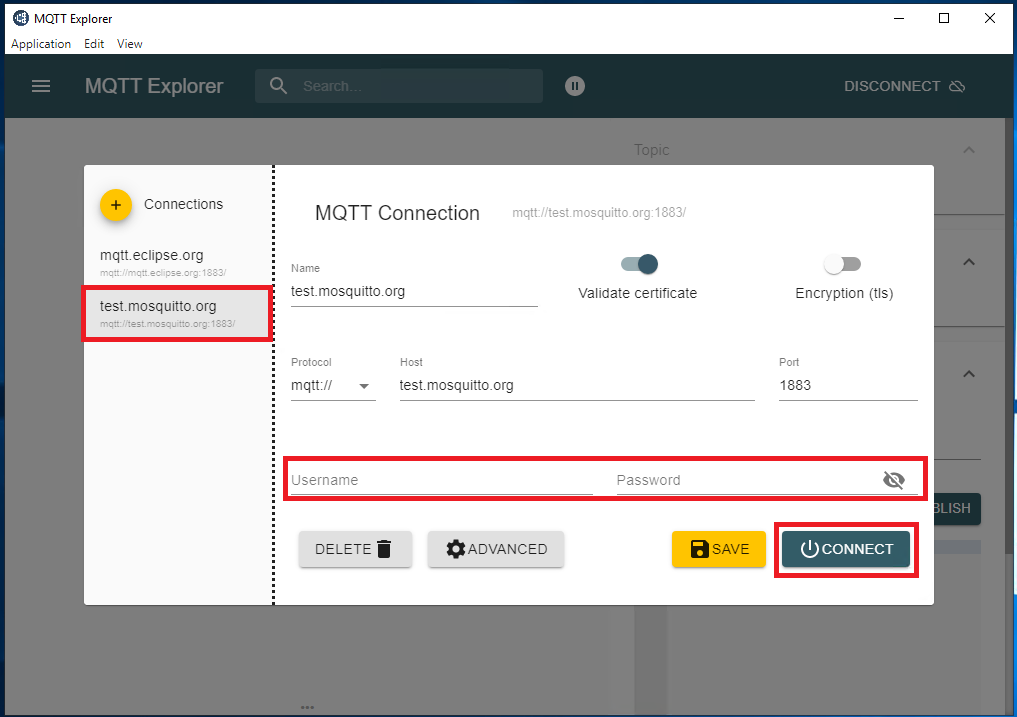
Once we choose the Broker we are connecting to, we will enter (if applicable) username and password to access the Broker. In this case, we will connect to the mosquitto public broker. For this Broker you can leave the username and password blank, since it does not require any identification to connect.
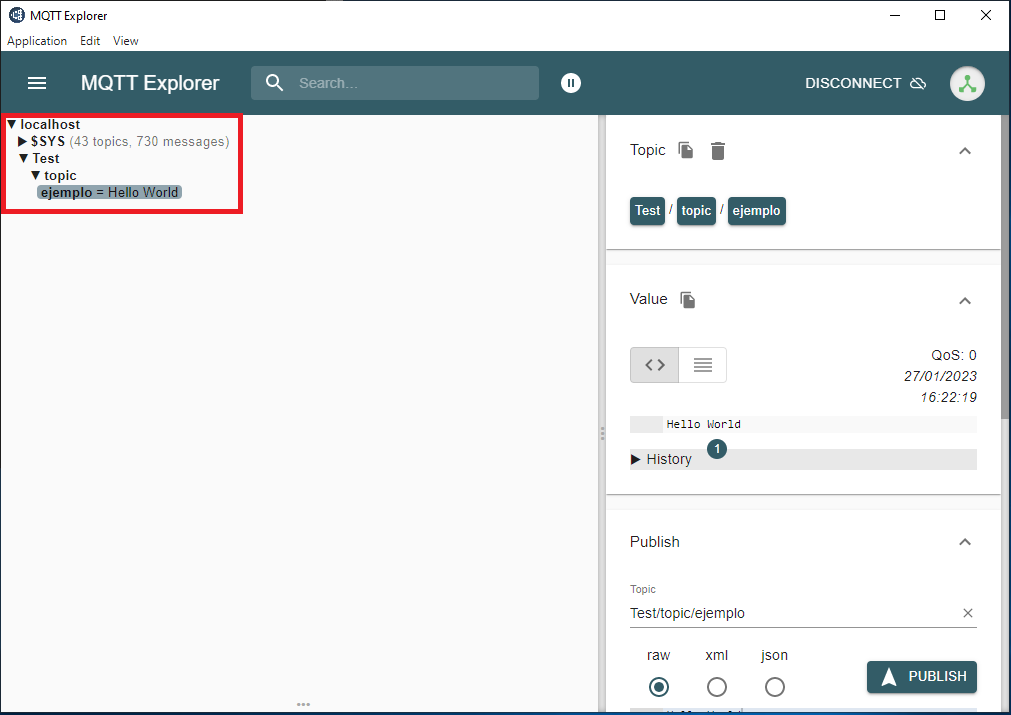
Once we click on the “Connect” button, all the topics published in this Broker will appear. As it is a public and open Broker, it is very possible that the information that appears is very diverse and, if we want to see the publication of our data in one of the topics, it is difficult to find it. We will solve this problem in our own Broker that we are going to create next.
Creating an MQTT Broker with Mosquitto
First of all, we must go to the Mosquitto web page and look for the download section to obtain the installer file (https://mosquitto.org/download/). In our case we will choose the installer for Windows 64 bits.
The installation is simple: You will only have to click on “Next” until the “Install” button appears. Once mosquitto is installed (it won’t take more than 10 seconds), click on “Finish” to exit the installation process.
With this, we would already have our own Broker created but it will not be running yet. To run it we will have to open the task manager, open the “Services” tab and search for “mosquitto”. It will appear as “Stopped” so right click on the service and select “Start”. Its status will now have changed to “Running”. With this we now have the Broker running.
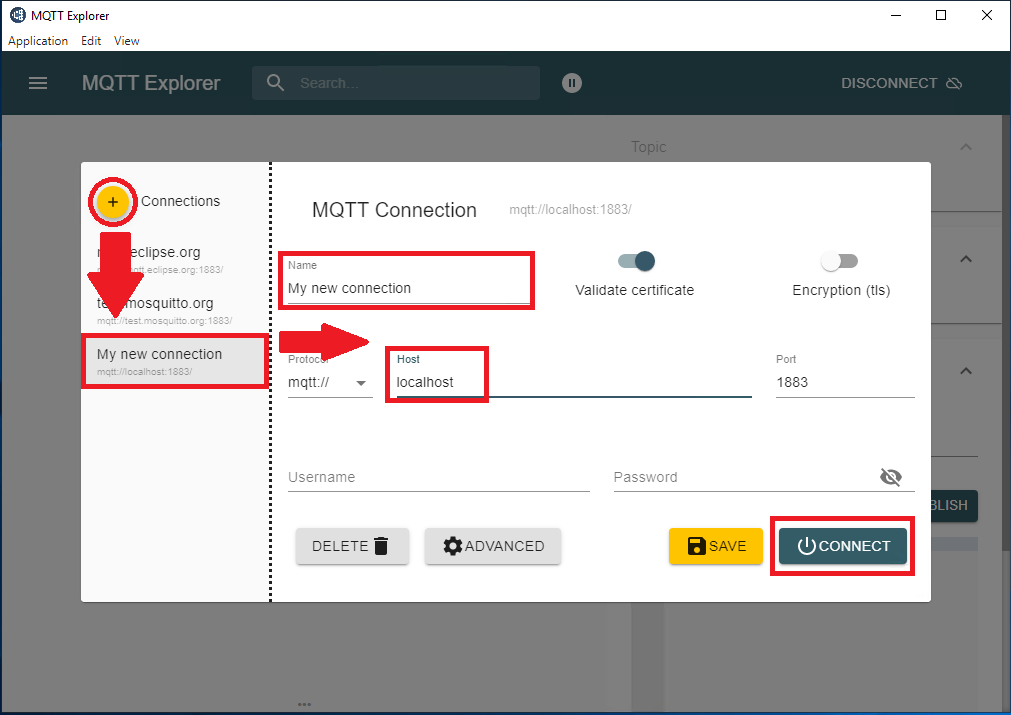
To connect to it, simply open MQTT-Explorer again and in the top left corner add a new connection as shown in the following image.
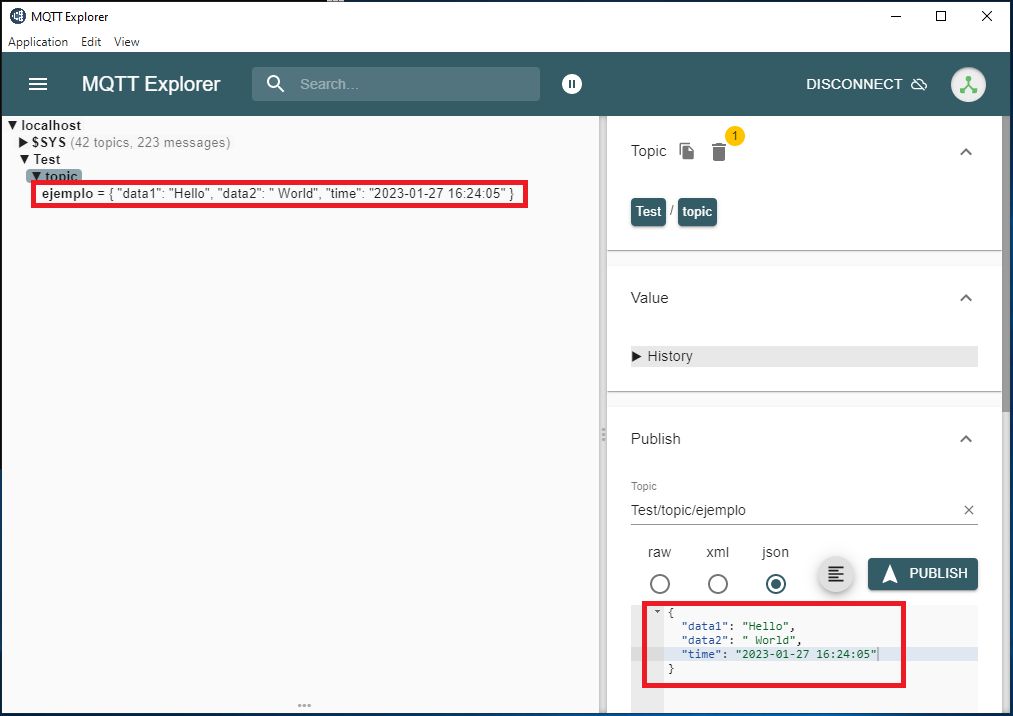
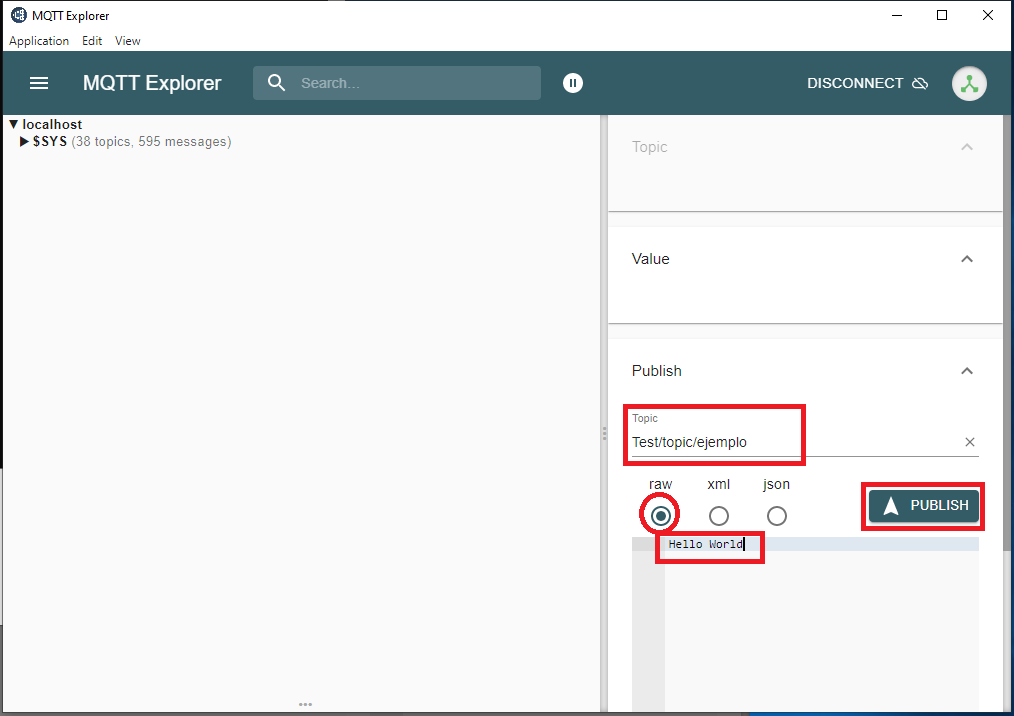
Once connected, we will see that there is no topic beyond “$SYS”. To write in one, try to write in the “Publish” section a topic like “Test/topic/example”, and in the message write anything you can think of. Don’t forget to set the message type as “raw”, unless you know how to (and want to) write in xml or json format. Look at the following image to see these details.
Add user and password to the Broker
Now we will see how to configure a user and password to secure our data a little bit. The Broker configuration is stored in a file called “mosquitto.conf” which, if we have installed the software in the suggested path, is located in “C:\Program Files\mosquitto”. When we open it with notepad or similar, we will see that it has 905 rows of text that can be tedious to read. Therefore, to have a minimally secure broker I advise you to rename the file “mosquitto.conf” to something like “mosquitto.conf.old” to have a backup of what a complete mosquitto configuration file looks like (although you can find it on the internet without any problem). Remember to stop the mosquitto service in the same way as before, through the task manager. Now, open a notepad or similar with administrator permissions and copy the following:
listener 1883 0.0.0.0.0
allow_anonymous false
password_file C:/Program Files/mosquitto/password-file
As you will see, we have added a path to a password file, which we will create right now using two alternatives (Cope, Mosquitto Username and Password Authentication -Configuration and Testing, 2022):
Method 1
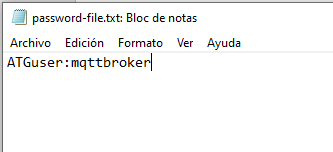
Open a notepad as administrator and write a username and password that anyone who wants to access the Broker will have to log in with as follows:
User:password
For example, we in this blog will create a user named ATGuser and password mqttbroker. Therefore, we will have to write in the notepad:
ATGuser:mqttbroker
To save it, we must use the same name that we have put in the mosquito configuration file: password-file. You can also choose another name yourself, but remember to rename it in the mosquitto.conf file for it to take effect.
Important: delete the .txt extension from the password-file so that the mosquitto_passwd script can find it. When you get the warning that the data in the file may be lost, click OK, don’t worry about it.
Close notepad and open a terminal as administrator (start button and type “cmd”) and change to the directory where mosquitto is installed. By default, it is installed in C:/Program Files/mosquitto, so move with the “cd” command to this folder.
Now, you will need to run the mosquitto_passwd script followed by a series of arguments:
mosquitto_passwd –U <passwordfile>In our case:
mosquitto_passwd –U password-fileIf you reopen the password-file document you will see that the content has changed a bit.

The password is now encrypted, but mosquitto understands exactly what password we have chosen.
Now, start the mosquitto process again from the task manager and you will see that, when you try to log in with MQTT-Explorer, you will need to include username and password to be able to connect.
Method 2
You can also create the password-file from the command terminal as follows:
mosquitto_passwd -c
In our case, taking the same example, it would be:
mosquitto_passwd -c password-file ATGuser
From the terminal it will ask you for a password. You will not be able to see what you are typing, so be careful to type it correctly.
That would be all for this method, remember to restart the mosquitto service from the task manager for it to take effect.
References
Cope, S. (2018). Beginners Guide To The MQTT Protocol. Retrieved from http://www.steves-internet-guide.com/mqtt/.
Cope, S. (2022). Mosquitto Username and Password Authentication -Configuration and Testing. Retrieved from http://www.steves-internet-guide.com/mqtt-username-password-example/.
Cope, S. (2022). Using The JavaScript MQTT Client With Websockets. Retrieved from http://www.steves-internet-guide.com/using-javascript-mqtt-client-websockets/.
Eclipse. (2023). Eclipse MQTT Broker. Retrieved from https://projects.eclipse.org/projects/iot.mosquitto.
HiveMQ. (2023). The Free Public MQTT Broker. Retrieved from https://www.hivemq.com/public-mqtt-broker/.
Mosquitto. (2023). Mosquitto MQTT. Retrieved from https://test.mosquitto.org/.
MQTT. (2023). Página principal de MQTT. Retrieved from https://mqtt.org/.
Nordquist, T. (2019). MQTT Explorer. Retrieved from http://mqtt-explorer.com/.
npm – . (2022). MQTTjs. Retrieved from https://www.npmjs.com/package/mqtt#store.
Python Package Index. (2021). paho-mqtt. Retrieved from https://pypi.org/project/paho-mqtt/.
Söderby, K. (s.f.). Sending Data over MQTT. Retrieved from https://docs.arduino.cc/tutorials/uno-wifi-rev2/uno-wifi-r2-mqtt-device-to-device.
Does anyone have thoughts on possible solutions to this issue